Did you know that organizing your digital files can make you more productive? Did you also know digital files can pile up just like that stack of papers on your desk or in your office? If you don’t have a digital filing system in place, a virtual mess can accumulate very quickly. You can’t ignore that stack of papers that needs to be filed but for so long. However, digital files can be ignored forever because they are out of sight somewhere on a hard drive. Nowadays, technology makes it easy to search for files using keywords, so it can be easy to not maintain digital files. However, wasted time is still wasted time if you’re hunting for files. Which is why I have compiled some tips to get those virtual files organized.
The Digital Filing Cabinet Set Up
- Create a folder and title it “All Digital Files”. This is your new digital filing cabinet. You can use the “My Documents” folder for this purpose, but I’ve found it to be more productive to open the “My Documents” folder and create a single folder and label it “All Digital Files” or “your name Filing Cabinet”.
- Create a folder and label it “Downloads”. When you download any files, documents, or pictures, you can save them here. Be sure to set this new folder as the default for all downloads by setting your web browser to automatically detect it as your default downloads default location. If you already know where your current downloads folder is located and use it regularly, you can continue to use it instead of creating a new “Downloads” folder. However, if you do not know where it’s located, creating one inside the folder “All Digital Files” will make it easier to locate and utilize efficiently. You can access in Chrome by:
- Open your Chrome browser.
- Click on the 3 dots that are the far right of the screen (under the X in the browser).
- Choose “Settings”.
- On the left side of the settings screen, click on “Downloads”. You should now see something like the image below.
- You can choose to either change your download location by clicking “Change” or you can have Chrome prompt you to choose where you save each file prior to downloading it by turning the slider to the on position.

3. Create folders for each category type of file that you save. For example, if you have files for different departments (i.e., Accounting Dept., Marketing Dept., Operations Dept., Manager Name 1, etc.), you will create a folder for each department and or manager. These folders will be your sub-folders listed inside of your “All Digital Files” or “My Documents” folder.
4. Create additional sub-folders. Now that you have created and labeled your major category folders (i.e., Accounting Dept.), you may need to break down each of those categories even more. For example, inside your Accounting Dept sub-folder, create a new sub-folder or categories and label them “California Office”, “North Carolina Office”, etc.
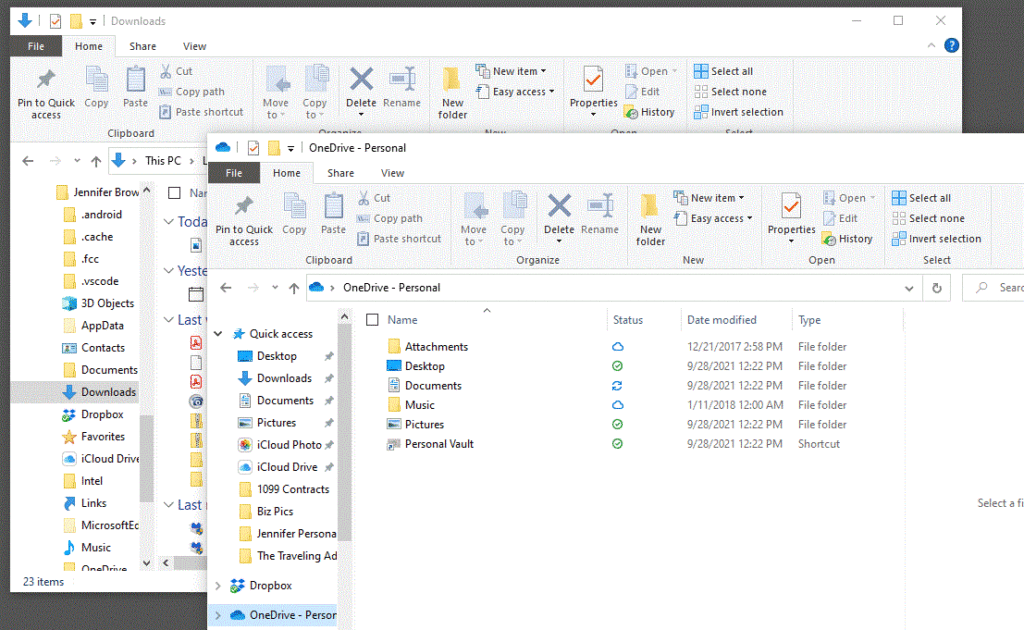
Now that you have set up your virtual filing system, you can organize all the files you have saved on your computer. The easiest way that I have found to do this is by opening File Explorer twice (have 2 instances running at the same time). This way you can view all the files not in your new digital filing system on the left and view your new digital filing system on the right. Using this method will make it quick and efficient for you to drag and drop files from the old, scattered, system into the new and improved filing system.

Maintaining Your New Digital Filing System
Here are a few tips that will help you maintain your new digital filing system.
- Pin your digital filing cabinet folder to your Quick Access list. This will allow you to access your digital filing cabinet quickly from file explorer. To add a folder to Quick Access, open your Digital Filing Cabinet folder in File Explorer. Make sure the navigation pane is visible on the left side of the screen. Right click on your digital filing cabinet in the navigation pane and choose “Pin to Quick access”. You can also left click your digital filing cabinet to highlight it and then click on “Pin to Quick access” in the Home tab toolbar located at the top of File Explorer.
- Use file shortcuts to avoid duplication of files in different locations. For example, if you want to store File A under the Accounting and the Legal sub-folders, don’t copy it. Instead, create a shortcut to it. First, navigate to the desired file and left click on it to bring up a menu. Next, choose “Create Shortcut” from the menu options. This will place a shortcut of the file below the original file. Finally, drag and drop the shortcut to the desired folder.
No time to set up and maintain your digital filing system? Need it done right away? Let The Traveling Admin, LLC handle everything for you.
Click here ->> The Traveling Admin, LLC to give me a call today!

